Why You Should Optimise Your Dockerfile.md
Hear from one of our awesome engineers, Timothy Samuel, about his recent experience attending a Hands-On Day on Dockerfiles and how it relates to our work at EdApp.
A couple weeks ago I had the opportunity to attend a Hands-On Day at the AWS Office in Sydney, on Docker, the Container ecosystem in AWS and why you should move your monolithic application to microservices. During the event, the presenter mentioned that although Dockerfiles are super easy to get up and running, most people may fail to implement simple optimisations that can improve your docker build runtime.
Below I’ll cover the main components of docker and speak about our experiences in implementing these improvements, which are small but really powerful!
1. A quick intro into Docker Containers
Docker Containers provide a way to package an applications code and all of its dependencies into a single image, so that this image can be run quickly and reliably from any environment.
2. What is a Dockerfile?
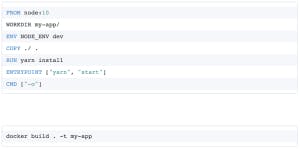
To create a docker container, you would place all your instructions in a Dockerfile. This Dockerfile is a simply a text document containing all the commands to build the image. An image is then created by running the following command in a terminal. Here the -t flag is specified, which tags the image with name provided after the flag, in this case my-app.
The . means the current directory, where the Dockerfile is located.
Docker works on the premise of starting at a base and then applying each subsequent instruction in a new layer, every new layer is cached. You can see this in action in the results printed to the terminal when building a docker container below. The cache speeds up the build time, as Docker reuses the same cached layer if no changes were made.
3. The general structure of a Dockerfile
Whenever you create a docker image, you will usually have some similar instructions to the ones below.
- Start from a pregenerated image FROM node:10
- Perform some setup
- Copy your source files to the image COPY ./ .
- Install the dependencies RUN yarn install
- Run your application
- Set your working directory WORKDIR my-app/
- Set an environment variable ENV NODE_ENV dev
- Set the ENTRYPOINT for your app ENTRYPOINT ["yarn", "start"]
- Set some optional arguments CMD ["-o"]
All together the Dockerfile contents are the same as the below snippet.
When building the docker image, (by running the above command) you will see some typical output as shown below.
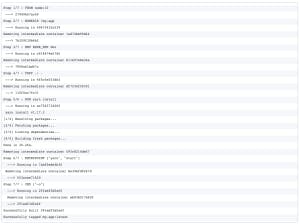
This is a success – you have built your image!
4. A common mistake
The Dockerfile instructions at the top will always work and this is great, as we need to make sure that we can all fix bugs, add new features and that our docker image will continue to build & run successfully.
One issue that is encountered is, longer build times that occurs when building the Docker image each time the source files change. Changes usually occur multiple times in a day, and for each change you would be testing that new features are working as expected or bugs have been fixed.
In most of these cases the initial instructions, and the application dependencies won’t change. This is really important to understand, as this is the common mistake and where the small change that leads to a big improvement lies. Remember the contents of our Dockerfile above.
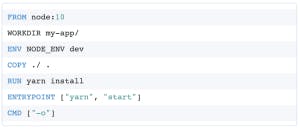
- Starting from the 4th instruction, we tell Docker to copy the whole app contents to the image and once done to install the dependencies, and later to run the app.
- As the source code keeps changing, Docker will recognise that there have been changes in this COPY command and will not use the cached layer from before.
- Also, all the instructions that follow this COPY command, will not use the cache as the last layer has changed and each instruction will need to be run again. This will include the layer that just installed all the dependencies, and this will need to be run again.
5. Small change to big improvement
As just mentioned, we need to improve the steps around copying our whole app and then installing dependencies. Particularly as installing dependencies usually takes a large portion of the build time. To improve our build time, we are going to spilt up the COPY command into two parts and rearrange the install command:

- The first couple COPY commands will copy the files that have all of our app dependencies.
- Now we are going to run the install command, to install all of our dependencies.
- The second COPY command will copy the rest of our app source code.
Once we make these relevant changes, the two lines shown above in the Dockefile will have changed to what is shown below.

Once these changes are used to build the docker image, every subsequent docker build where the dependencies have not been changed will have a similar output to the one below.
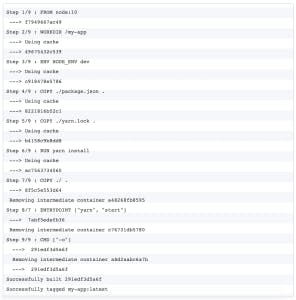
You will realise that up until the instruction to COPY over the rest of the source code (step 7), Docker is using the cached layers from a previous build as no changes have been made in applying those instructions and this causes the build time to significantly reduce.
6. Our own experiences
In our CI/CD pipeline, we realised that we were doing the same thing:
- Copying over our whole source code including the dependency files
- Installing the dependencies
- Running our app
In particular for one of our docker images:
- ~6 mins was the average time taken to build the image
- ~2 mins was the average time taken once the small improvement was made
This is a 66% reduction in build time and for our CI/CD pipeline, there are a many builds that are being processed throughout the day. Once you start to calculate the numbers you realise that a large proportion of time was used to install the dependencies that haven’t changed usually, and that was time that was just wasted.
Conclusion
Getting your first Dockerfile up and running is straightforward and does not require much effort. Once you start accelerating and have a faster velocity, where multiple teams are fixing bugs/creating new features all together, you have to start thinking about these small improvements. Especially where you have a CI/CD pipeline that is used to build the docker image and to run tests against the updated app functionality to verify the app is still functioning as desired.
Interested in joining the EdApp team?
At EdApp, we are constantly thinking of new ideas and the best ways to implement the latest technologies. We have a team of passionate and talented developers, and would love to share our journey with you! If you would like to learn more about working with us, visit our careers page or get in touch at careers@edapp.com.
Curated course examples
Author
Guest Author Daniel Brown
Daniel Brown is a senior technical editor and writer that has worked in the education and technology sectors for two decades. Their background experience includes curriculum development and course book creation.
